Part 3 - Calculating positioning errors for your AM printer
Part 1-2 recap:
- The additive manufacturing (AM) consumer is very enthused. They can pay 500,000USD for a printer without having a tolerance spec sheet for the printer
- Subtractive Manufacturing (SM) needs to deal with part accuracy only while AM needs to deal with part accuracy and Microstructural Integrity
- SM positioning system is linear and easy to predict
- AM positioning system in nonlinear and more challenging to predict
- Tracing the source of errors
- How errors propagate from the source to the print bed
Effects of location errors on the printed model
Location errors in SLS/SLM AM printers are traced to the noise and stability within the GS system, specifically the modulator, electronics driver, and mirror motors. Typical listed errors are linearity, repeatability, scale drift, and zero drift listed in radians units, percentages, or ppm (part per million).
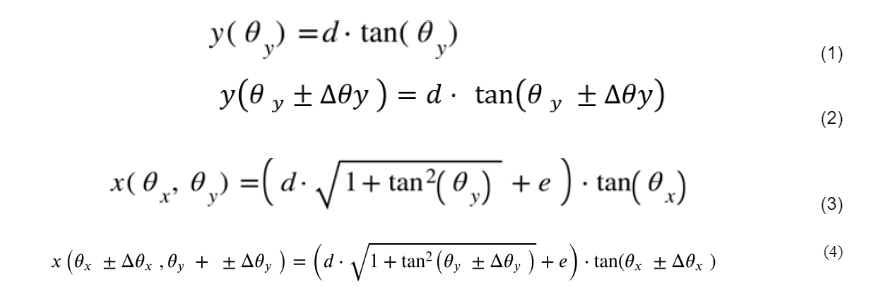
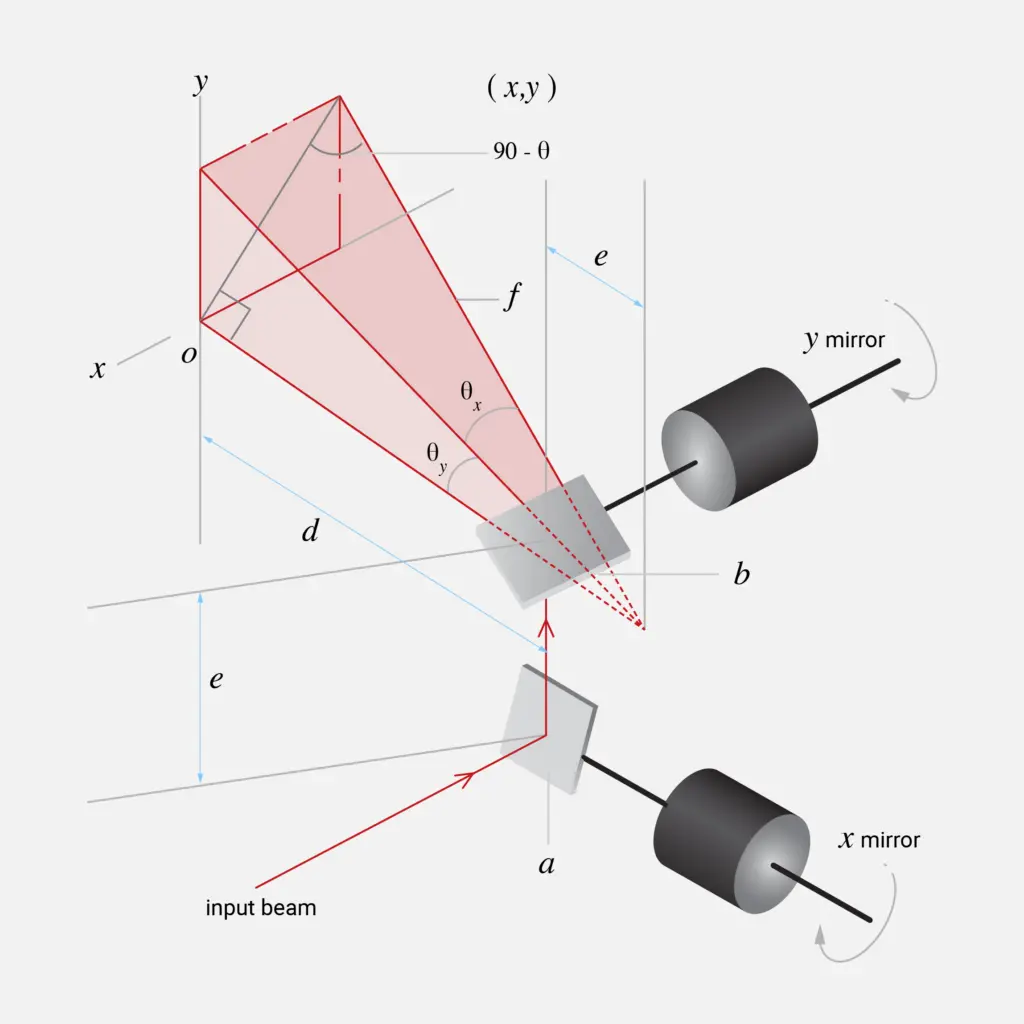
Short-term location errors as an example can be extracted from the galvanometer datasheet, listed as repeating errors, and provided in radians units. Then plug in the values into eq (1)-(4) see part 2 and in Figure 4 below. As an example, assume a ±25 micrometers location tolerance error and its effect on the print area.
Location error example
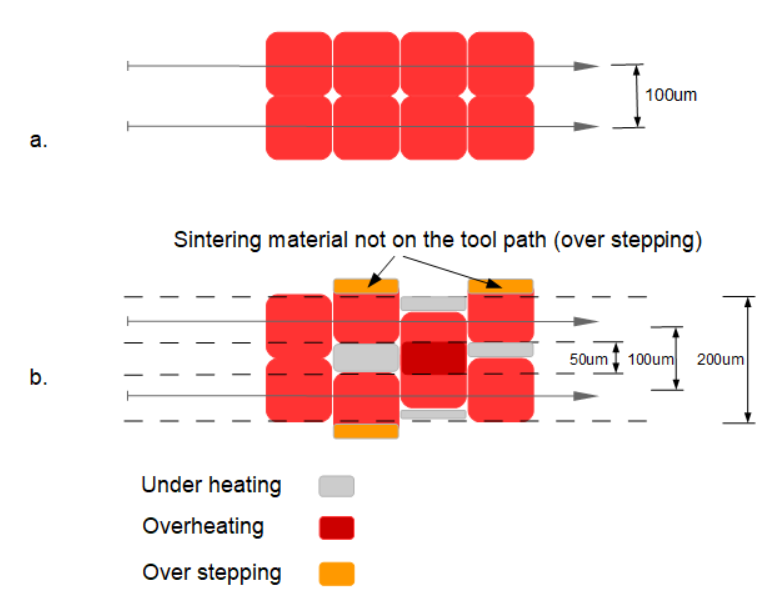
The tool path dictates how an area absorbs the heat. In this example, we’ll be filling up an area with two parallel tool paths, selecting a 100 micrometers beam diameter and a grid distance of 100 micrometers. To further simplify the example we’ll be assuming that the 25 micrometers tolerance applies only to the vertical component (y) to the tool path.
Figure 1.a. shows how an ideal print composed of two paths when a laser beam should run with 0 tolerance error. Figure 2.b. shows the effects of the ±25 micrometers on eight neighboring pixels.

Figure 2.b. shows how accuracy affects the microstructural integrity by either over-sintering part of the pixel or under-sintering.
In actuality, the results may have much larger variations that depend on any pixel on the tool path. As the tool path is controlled by the two GS where each pixel location will be reflecting tolerance errors as a function of the θy and θx (see eq 1-4 in part 2). hence the vector sum for the 25 micrometers from each GS will be reflected to be ~ ±35 micrometers.
Printing of a hole
Let’s consider printing a 1 mm (1000 micrometers) diameter hole. The area around the hole will be sintered. Assuming the location tolerance is 25 micrometers, the hole diameter tolerance will be at ±5% if placed at the print bed center and if placed at the print bed edge is ~±7% tolerance. It is important to note, not to expect better results from a hole tolerance because statistically, the hole tolerance depends on many layers. As a result, you should not expect better than the worst-case tolerance for a hole diameter.
Offset/Drift Error - the moving target error
Some of the GS manufacturers list additional long-term errors. These errors shift coordinate origin and affect linearity. To analyze these types of errors, we need to distinguish between Accuracy and Precision. Accuracy measures how close the results are to the true or known location. Precision, on the other hand, measures how close result locations are to one another.
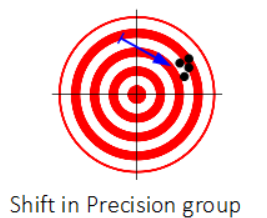
Since the printed model can be placed anywhere within the powder bed, precision might seem to be sufficient assuming it is consistent. However, long-term errors such as drift/offset errors will be shifting the origin. And if the origin has changed then precision is not sufficient any longer as Figure 3 shows how the precision area shifted.


Considering a long print time then the drift will be adding a significant amount of errors. Figure 3 shows how precision can shift. As a result, many printers are equipped with a closed-loop system to find and monitor the drift. This way there is mitigation, but not complete elimination of these kinds of errors. The closed loop tolerance errors should be provided (if your printer is equipped with one) by the printer manufacturer in terms of radians units.
Keep it cool
Another factor affecting accuracy and precision is the temperature variation within the GS system. Any shift, of even a few degrees (°C ) will be causing a change in accuracy/precision. GS manufacturers provide in the datasheet not only the errors but also the temperature coefficient for the listed errors in radians/°C. To keep the temperature constant, the GS mirrors and control modules are kept at a set temperature, mostly by water cooling where the loop is closed. Closed-loop jitters errors will be introducing small noise into the GS positioning.
Conclusion
In conclusion, beam positioning depends on the GS quality and part placement on the print bed. The error tolerances can be calculated. Most importantly, the effect of location accuracy on the print path is also dictating the energy deposited at and around the tool path. Although in this part we analyzed location tolerances we also have shown the severity impact on the print microstructural consistency. Any error that is temperature dependent such as offset/drift error needs to be kept within a reasonable temperature window, creating a “moving target” challenge for the printer designers.
SLS/SLM Galvanometer based printer positioning equations


FAQ
Back to Standards in AM home page


