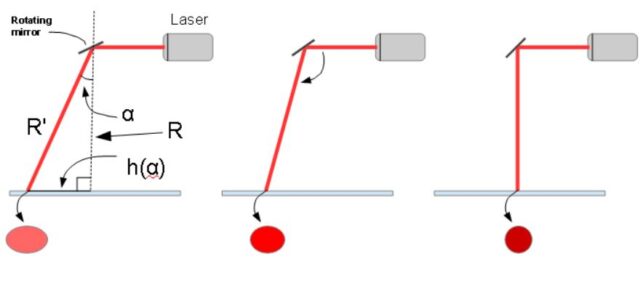
| α range | 22° < α >11° | 11° < α <0° | α~0° |
|---|---|---|---|
| Beam size/shape | Severe Distortion | Distortion | ✔ |
| Resolution grid | Severe distortion – Print size increased | Distortion | ✔ |
| Beam speed | Increased Exponentially | Increased | ✔ |
| Energy absorbed | Decreased exponentially | Decreased sharply as the four errors amplify the total error | ✔ |
| Layer to Layer bond energy | Decreased exponentially as four errors effects this parameter | Decreased | ✔ |
Abstract
Many SLS/SLM users experience many types of degradation in quality. A leading 3D online publication published in 2018 revealing a glimpse into some of the problems. In this article, we will not only define the issues (four major Errors) but also quantify the Errors. Additionally, we will show the cumulative effect on a 3D print quality. Therefore, the problems known are amplified. Some users may be under the impression that the f-theta, flatfield, or telecentric lens solves the problems. Not so.
To analyze the 3D SLS/SLM system we are simplifying the system as a raw system where the Galvanometer runs at a constant angular speed. Please note: Galvanometers for SLS/SLM do run with a speed compensation waveform such as sine wave. Therefore, surface speed correction is embedded in the system and/or the use of the f-theta lens. In such a case, the Galvanometer manufacturer can provide compensation errors within the specifications. Some companies do control the Galvanometers directly to compensate for the speed Errors with additional software compensation for Energy losses as well. Any compensation comes with a cost (speed, calibration, tuneup and additional errors to account for) The purpose of this article is to quantify the errors and provide the proper remedy (is there a remedy?). Alpha (α) is the angle between the Laser Beam to the Normal to the work surface.
Errors list as Alpha (α) increases. Alpha(α) increases when the beam moves away from the origin (print center):
Error#1: Laser beam speed is increasing
Error#2: Energy absorbed by the surface decreases
Error#3: Beam enlargement – Beam size and shape changes
Error#4: Focal beam is not on the work surface
Error#1: Laser beam speed is increasing as Alpha (α) increases
(1) V0 = ω*R ; Beam Surface speed at the center
(2) h = R*tan(α) ; Travel distance on work surface
(3) α =ω*t ;
(2) (3) v(t) = dh/dt = d[R*tan(ω*t)]/dt = R*ω*1/cos^2(ω*t)
| Beam Speed | v(t) = V0*1/cos^2(ω*t) |
|---|
Test values
| ω*t (α)–> | v(t) |
|---|---|
| PI/4 (45°) | V0*2 |
| PI/8 (22.5°) | V0*1.17 |
| PI/16 (11.25°) | V0*1.03 |
| Error #1 Shows speed acceleration when it is moving away from the origin. Therefore, the beam delivers a smaller amount of energy for coordinates that are further away from the origin. The increase in beam speed causes the beam to stay a shorter time on the surface, thereby reducing the Sintering/Melting energy. To keep this error small companies limit the Galvanometer movement to a maximum movement of ±11.5° (see Table above) thereby, limiting the errors within 3% on the X-axis. When adding Y-axis Error#1 (adding Vx and Vy vector) grows to 4.2%. | |
Derivatives errors (more errors) derived from Error#1:
Modulation shift sintering coordinates as modulation “assumes” constant speed. F-theta lens was designed to solve this nonlinearity where the f-theta lens is performing a transformation of f*Tan(θ) to f*θ. Using f-theta is only addressing Error#1 while adding the following limitations: 1. Not all f-thetas are made equal. Therefore, no production repeatability as f-theta will add beam location error that is unique for each lens. 2. f-theta can not be made large as there is manufacturing limitation. Loss of scalability.
Error#2: Energy absorbed by the surface decreases
Lambert’s cosine law (physics): The energy absorbed by a surface is inverse-proportional to the striking beam angle to the Normal.
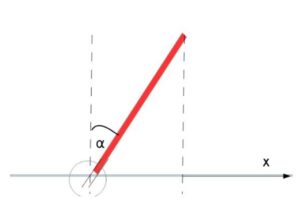
If E0 is the energy at the center (origin) then the energy absorbed by the work surface is quantified by:
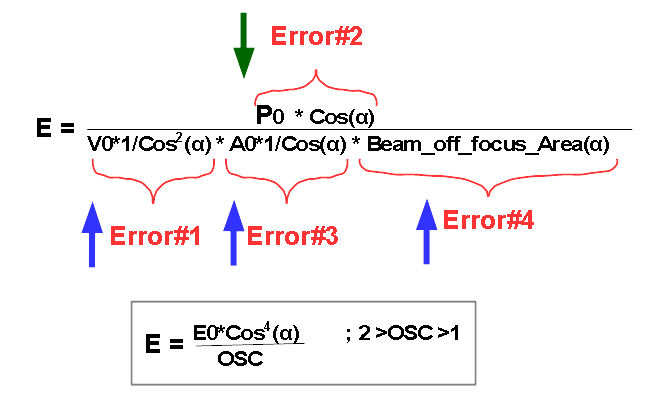
E (ω*t) = E0*Cos(ω*t) ; Error #2
Error #2 causes a smaller amount of energy to be delivered to the work area as α grows. Please note: α =ω *t
Error#3: Differential laser beam shape
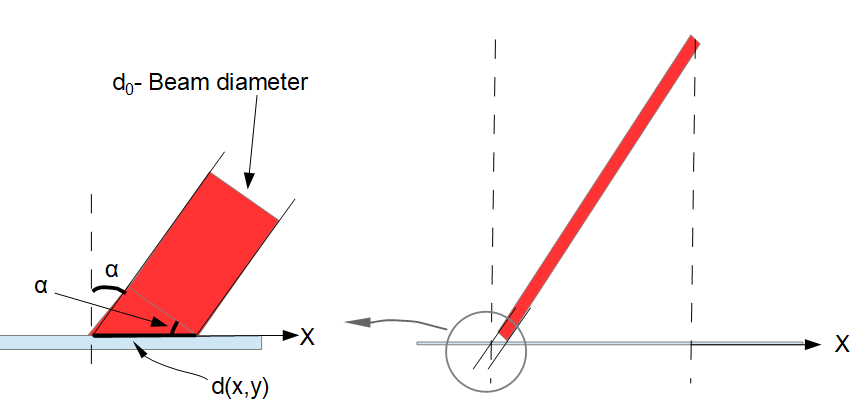
Assume a collimated circular beam with beam diameter d0 striking normally to the work surface.
As seen from Fig.3, the beam cross-section is no longer circular as the angle of incidence α increases. The circular cross-section progressively evolves into an ellipse defined by dx and dy.
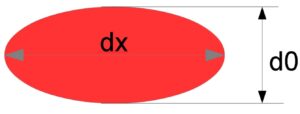
Major axis dx can be expressed as,
dx = d0/cos (α)
Cross-sectional area A of elliptical laser beam shown in Fig. 4 can be expressed as,
A = ℼ2 /4 × dx × d0
A = ℼ2 /4 × d02 × 1/cos(α)
A = A0 × 1/cos(α) (3)
where A0 is the area of circular cross section of diameter d0.
Note – For simplicity, error in consideration assumes differential changes along X-axis. Similar errors occur also along the Y-axis distorting the initial circular cross-section of the laser beam into an ellipse. Moreover, as the galvanometer mirrors rotate about X and Y axes, the distortion of a circular cross-section to the ellipse is the vector sum of distortion along each axis. There will be additional 2D distortion (Barrel distortion) within the galvanometers.
lease note: This Error reflects only the beam along the X-axis. The same augmentation occurs along the Y-axis. Moreover, when the galvanometer is moving between the X and Y axis it is reflected in both. As an example at the edge of the print (Xmax and Ymax), the beam will be round but enlarged as it is expanding in both axes evenly.
Differential beam shape (Error3), coupled with increased scan speeds as discussed previously, leads to decreased incident energy. This incident energy can be divided into two components – a horizontal component for build plane sintering and a vertical component for interlayer bonding.
1. Inconsistent interlayer bonding
2. Decreased resolution
3. Porosity
Sintering energy bond is reduced because the Area is enlarged. Therefore, the energy per unit area is smaller
Error#4: Out-of-focus incidence for laser beam
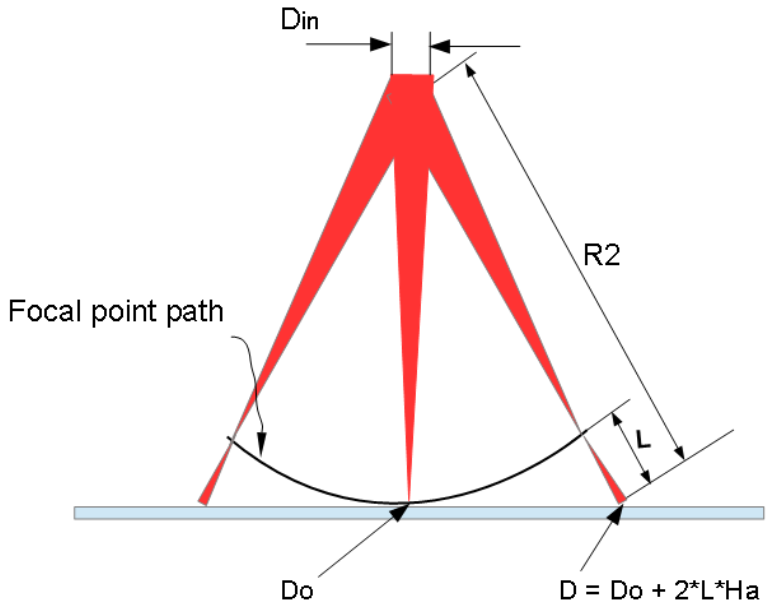
When the mirror oscillates back and forth it moves the Focus on a sphere (circle). Therefore, when the beam strikes the work surface it will be out of focus (larger beam). The beam size is dictated by the optical Na parameter (Numerical Aperture is the sine of the expanding half-angle of the beam).
Beam diameter size along the optical path is dictated by beam Half-angle (Ha) divergence or convergence angle and defined as the sine of expanding half-angle of the beam. The enlarged out-of-focus diameter D of the incident laser beam can be expressed as,
D = D0 + 2 × L × Ha
where D0 is the beam diameter at-focus and L = R2 – R.
R2 is the beam distance from the mirror to the work surface as the beam travels away from the initial start point as seen in Fig. 5.
D = D0 + 2 × R × (1/cos(α) – 1) × Ha (4)
Off Sphere Constant (OSC) can be defined as ratio of out-of-focus beam diameter to in-focus beam diameter and is expressed as,
OSC = D ÷ D0
= 1 + 2 × R × ( 1/cos(α)– 1) × Ha ÷ D0
Specifications data from a typical powder bed fusion machine manufacturer suggests an approximate value of 1.5 for OSC and it varies as a function of R, Ha, and α.
Output beam diameter at focus = Do
Input beam diameter at galvanometer mirror = Din
D0 = Din – 2 ⋅ R ⋅ Ha
∴ Ha = (D0 – Din )/ (2 ⋅ R)
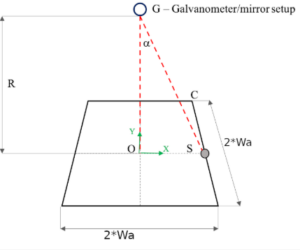
From Fig. 6, tan (α) = Wa / R = K
Substituting the above expressions in Eq. (3) where Ha is substituted with -Ha,
D = Do + ( Din – D0 ) ⋅ (1/cos(arctan(K)) – 1 )
Fig. 7 shows a graph of the above equation with Do = 0.1 mm.
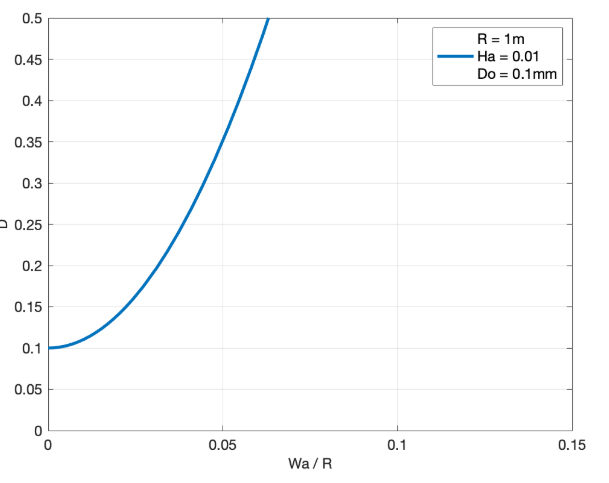
As seen from Fig. 7, the cross-section area of the beam striking the work surface increases exponentially as K increases. As K represents the ratio of bed size to R (Wa/R) it demonstrates clearly that R needs to be relatively large in comparison to the print bed to keep the beam diameter distortion to a minimum.
The following example provides a quantitative perspective on shortcomings on the use of galvanometers and the need for a sound solution.
E.g. –
Input beam diameter Din = 5 mm
Output beam diameter D0 = 0.1mm
Assume a print bed area of 300 x 300 mm2 with the galvanometer setup positioned symmetrically at a distance R = 2 m as shown in Fig. 8.
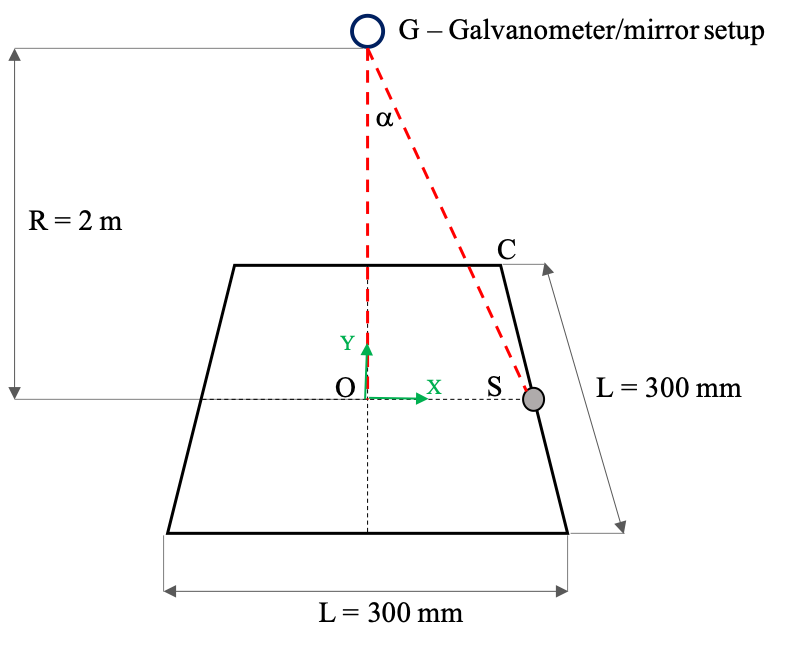
Assume that the beam needs to strike a point midway through any one of the sides of the print bed denoted by point S in Fig. 6. In this event, the scanning angle α can be found using trigonometry as,
Tan (α) = 0.15 ÷ 2
∴ α = 4.2°
Ha can be calculated using the expression,
Din = 2 × Ha × R × D0
Substituting values for Din, R, and D0
Ha = 0.0125
Using Eq. (3), out-of-focus diameter D = 0.235 mm.
Print resolution is reduced to half since the beam diameter is more than doubled to 0.235 mm from initial in-focus diameter of 0.1 mm.
Consider the case where beam strikes point C in Fig. 6. The effective radius of the beam can be resolved byas,
RC2 = R2 + (2 × 0.15 )2
RC =2.011 m
Using trigonometry, effective angle of inclination α can be found as –
Tan (α) = 2 × 0.15 ÷ 2
∴ α = 6.07°
Using Eq. (3), out-of-focus diameter at point C: Dc = 0.438mm.
Print resolution is severely affected since the beam diameter is more than tripled to 0.438mm from initial in-focus diameter of 0.1 mm. This indicates that increase in beam inclination α as well as increase in effective radius R has adverse effects on print resolution.
One of the ways to mitigate this particular error is to use large values for R relative to the print size. Higher values for R indicate more travel on the print bed achieved with a comparatively lesser rotation of galvanometer i.e. α for the projected beam. Increase in out-of-focus beam diameter D is restricted since it is inversely proportional to cosine (α). However, an increase in R also results in increased physical dimensions of the printer and sensitivity to vibrations. Furthermore, when the beam is directed at off-axis points, say point C, the field of view angle α is now the vector sum of inclinations on the X and Y-axis. This results in larger values for α as well as increased effective radius R, both adding to increased distortion of incident beam as evident from the previous example.
Results
As discussed, galvanometer systems have inherent problems in their mechanisms that lead to heterogeneities in the build part. Table 2 provides an overview of errors discussed previously. For conciseness, error numbers designated in the first column correspond to respective error descriptions provided earlier. For simplicity, errors along X axis are summarized in Table 2 and it is expected that errors along Y follow a similar trend.
| Error | Resolution | Scan speed | Beam Size | Energy Absorption |
| 1 | Unchanged | Increased | Unchanged | Decreased |
| 2 | Decreased | Unchanged | Increased | Decreased |
| 3 | Decreased | Unchanged | Increased | Decreased |
| 4 | Decreased | Unchanged | Increased | Decreased |
Energy E, can be expressed in terms of power P and time T as,
E = P × T
Energy density Ed, defined per unit area, can be expressed as,
Ed = E ÷ A2
where A2 is area of single rectangular track deposited by beam of diameter d with velocity V for T time and is expressed as,
A2 = d × V × T
Substituting expression for area in energy density,
Ed = Pd×V
From errors in galvanometer scanning discussed in previous sections, the beam diameter d, velocity V, and incident power P change. Substituting corrected expressions for these terms,

where V0 is constant.
Eq. (5) can be expressed as a function of deflection angle α and OSC as,

Figure 9 shows a plot for Eq. (6) for two different values of OSC viz, 1 and 1.5. The unit value for OSC indicates an ideal situation where the beam diameter would not increase due to out-of-focus incidence. However, the energy density still changes as a function of deflection angle α as seen from Fig. 9. OSC of 1.5 is a typical value reported in speciation data for contemporary 3D printer manufacturers.
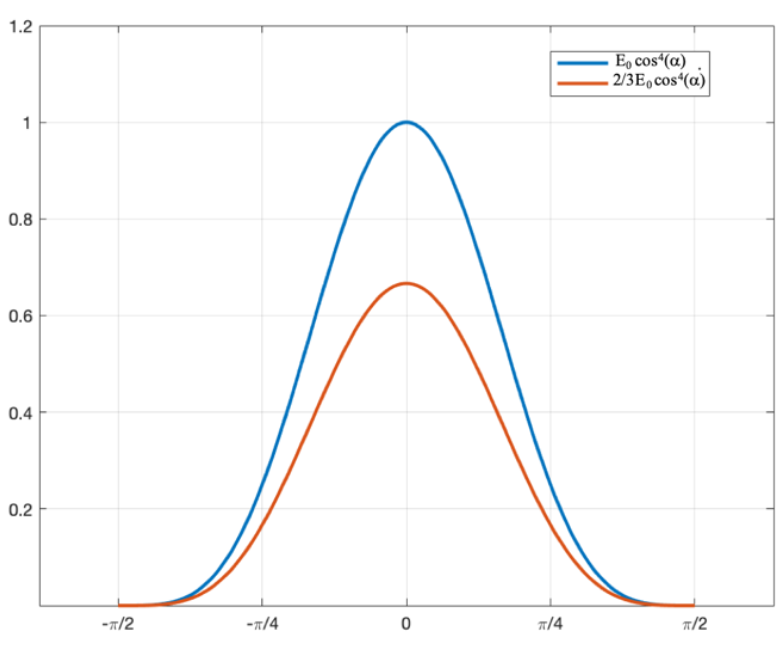
As observed from the graph, energy density decreases exponentially as the field of view angle α deviates from the mean position. Furthermore, energy density for the graph with an OSC of 1.5 is less compared to energy density for a unit OSC regardless of α. A higher value for OSC indicates an increased possibility of a considerably less amount of energy available for sintering.
As evident from results, inclination angle α governs various processing parameters including beam cross-section, scan speeds, and energy density among others. Table 2 below summarizes errors introduced as the galvanometer directs the incoming laser beam at various angles of inclination α. It is important to note that errors discussed throughout the paper were constraint to one axis, say X, on the X-Y coordinate system. Similar errors will be observed for measurements on Y-axis with the total error being the vector sum of individual errors.
| Parameter | 22° ≤ α >11° | 11° ≥ α > 0° | ~ 0° |
| Beam cross-section | Severe distortion | Distortion | ✔ |
| Resolution | Severe distortion | Distortion | ✔ |
| Scan speed | Increases exponentiallyproportional to 1/Cos2(α) | Increases exponentially proportional to 1/Cos2(α) | ✔ |
| Energy density | Decreases exponentiallyproportional to Cos4(α) | Decreases exponentiallyproportional to Cos4(α) | ✔ |
As seen from Table 3, distortions grow exponentially with an increase in inclination angle α rendering the system largely erroneous for the range 11° – 22°.
In order to mitigate errors, the movement of the mirrors in the galvanometer is restricted, resulting in underutilization of the scanning system. Furthermore, limiting inclination for laser beam leads to a decrease of the print area since the beam can now be not directed further away from the mean position.
A second Example:
Collimated input beam diameter: 5 mm
Output beam diameter: 0.1mm
R = 2 meters
Works table area 300×300 mm
Tan(α) = 0.15/2 = 0.075
→ α = 4.2 °
Conclusion
As reported, traditional scanning systems have problems in their mechanism to direct a laser beam onto the target plane. The use of galvanometer systems leads to discrepancies such as the differential cross-sectional area of the beam, non-normal incidence, increased scan speeds, and more. The use of F-theta lenses and offset-mapping software can only mitigate these problems to a certain extent. The challenge to address four types of Errors could never deliver a sound solution as each of the Error components. Additionally, it is not only about energy density but also about the accurate positioning of the beam on the work area. The positioning of the beam is governed by the Galvanometer repeatability Error where for a typical system it is about 3 micro radians. When attempts are made to solve the four Energy density Errors by enlarging R as shown it will also increase the positioning Error! As an example for a printer of R = 5 meters the positioning error is:
FOV_angular_error * R where FOV = 2*Galv_angular_angle
= 2*Galv_angular_angle*R
= 30 micrometers
Tecnicas’ technology completely eliminates the errors encountered including the positioning errors with the use of the galvanometer system. Tecnica3DTM uses two mirrors where one mirror is stationary and the other constantly rotating to direct the incoming laser beam onto the print bed. Since there is no oscillating mechanism, the incident beam is always in-focus and normal to print the surface. With Tecnica3DTM, the laser beam does not suffer from any lens aberrations or loss of energy density as the system is lens free.
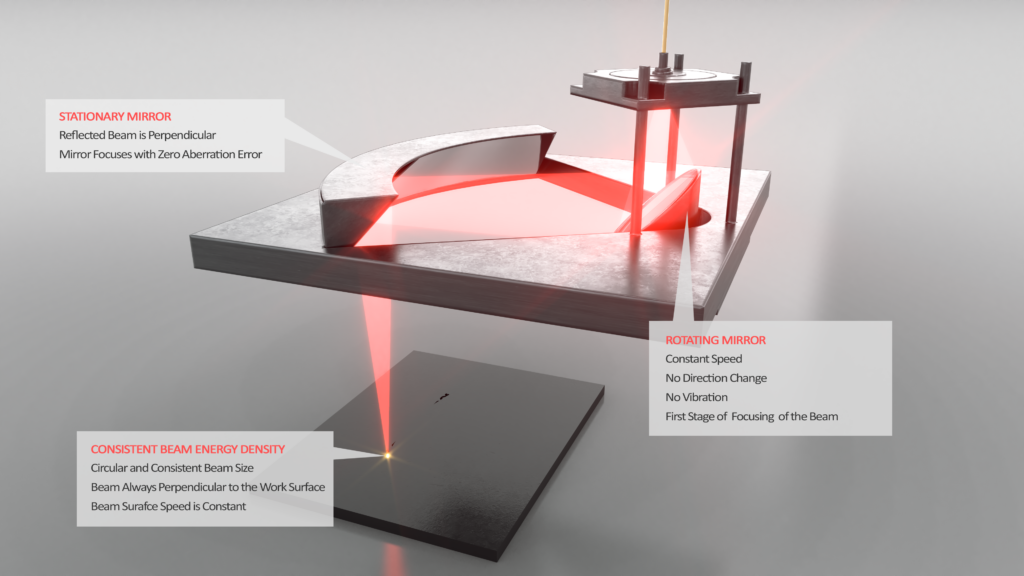
Tecnica3DTM surpasses the performance of the galvanometer based system in beam accuracy, scan speeds, and energy delivery consistency delivery of beam energy to the work surface.compared to existing systems. Furthermore, Tecnica3DTM uses a mirror setup instead of a scanning lens enabling scalability of the system, since unlike lenses mirrors do not have manufacturing constraints. With Tecnica3DTM, the incidence of the laser beam is always normal to the print bed regardless of the target point. This ensures uniform energy input to each powder particle on the bed for proper fusion, thus improving structural integrity and dimensional accuracy of the building part.
References:
[1] Fabbaloo.com – Why are 3D printers so tall?
[2] RP-Photonics – Scanning lenses.
[3] B. P. Conner, G. P. Manogharan, A. N. Martof et al., “Making sense of 3-D printing: Creating a map of additive
manufacturing products and services,” Additive Manufacturing, vol. 1, no. 4, pp. 64-76, 2014.
[4] K. V. Wong and A. Hernandez, “A review of additive manufacturing,” International Scholarly Research Network
(ISRN) Mechanical Engineering, 2012.
[5] D. Faidel, A. Laskin, W. Behr, and Natour, “Improvement of selective laser melting by beam shaping and minimized
thermally induced effects in optical systems,” in Proc. 9th International Conference on Photonic Technologies, 2016.
[6] Q. Zhao, C. Wang, and J. H. Yang, “Graphic distortion analysis and correction arithmetic research on laser
galvanometer scanning,” Journal of Changchun University of Science and Technology, vol. 35, no. 4, pp. 63-75,
2012.
[7] C. K. Zhu and L. P. Ding. “Research on forming qualities during selective laser melting based on scanner delay
strategy,” Applied Laser, vol. 37, no. 2, pp. 207-212, 2017.
[8] X. Luo, J. Li, and M. Lucas, “Galvanometer scanning technology for laser additive manufacturing,” Proceedings of
SPIE, Vol. 10095, 2017.
[9] G. Y. Li, Y. Z. Wang, J. R. Han, and S. Y. Liu, “Geometry algorithm of galvanometer system correction for rapid
prototyping of machine parts,” Machine Tool & Hydraulics, vol. 42, no. 19, pp. 28-30, 2014.
[10] Q. Zhao, C. Wang, and J. H. Yang, “Graphic distortion analysis and correction arithmetic research on laser
galvanometer scanning,” Journal of Changchun University of Science and Technology, vol. 35, no. 4, pp. 63-65.
2012.
[11] H. W. Yoo, S. Ito, and G. Schitter, “High speed of laser scanning microscopy by iterative learning control of a
galvanometer scanner,” Control Engineer Practice, vol. 50, pp. 12-21, 2016.
[12] Huang Jigang, Qin Qin, Wang Jie, and Fang Hui – Two-Dimensional Laser Galvanometer Scanning Technology for
Additive Manufacturing. International Journal of Materials, Mechanics and Manufacturing, Vol. 6, No. 5, October
2018
[13] Design of Large Working Area F-Theta Lens Gong Chen
optics.arizona.edu/sites/optics.arizona.edu/files/msreport-gong-chen.pdf

